How to upload beats on Beat22?
Welcome to Beat22, your home for selling beats to artists, content creators, and music lovers worldwide. Uploading your first beat is super easy, and we’re here to walk you through the entire process like a friend.
Let’s get started!
Step 1: Click “Upload” on the Top-Right
Once you log in, look at the top-right corner of your screen.
Click the ![]() button to begin the process.
button to begin the process.
This opens the 3-step beat upload form.
Step 2: Fill in Beat Metadata
This is where you describe your beat, basically telling people what it sounds like.
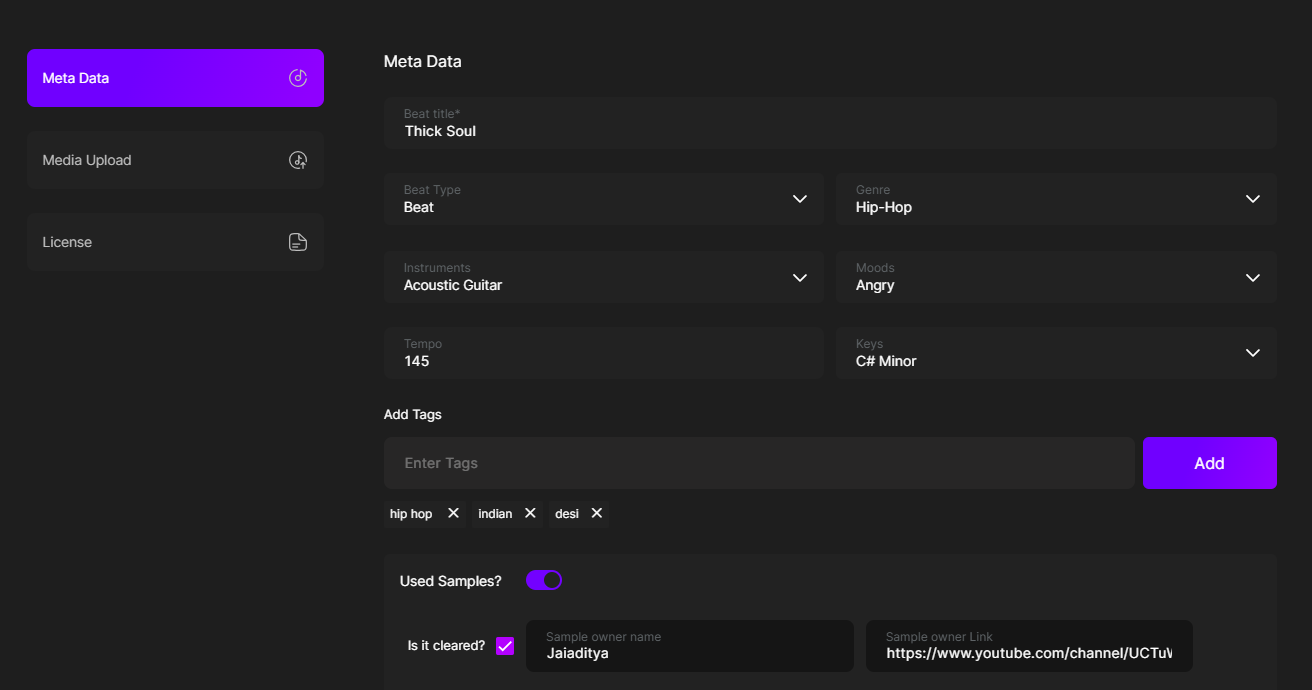
You’ll be asked to fill:
- Beat Title – Give your beat a name
- Beat Type – Beat, Switch Beat or Beat With Hook
-
-
Switch Beat in music means a beat or instrumental that contains two (or more) different beats played one after another within the same track.
It’s used to:
-
Surprise the listener
-
Keep the song fresh and engaging
-
Show off versatility in production
Common in hip-hop and trap, the switch often happens during a verse change, hook drop, or beat breakdown.
In short:
Switch Beat = one track, two beats, back-to-back, to keep the vibe exciting. -
-
Beat with Hook means the instrumental already includes a pre-recorded chorus (hook)—usually sung or rapped by a vocalist.
This hook is:
-
Catchy and repeated, like a chorus
-
Placed in the beat so the artist can build verses around it
-
Useful if you want a song structure that’s ready to go
In short:
Beat with Hook = instrumental + pre-made chorus. -
-
-
- Genre – Select the genre of the beat you’re uploading, whether it’s Trap, Drill, Boom Bap, etc.
- Instruments – Select the instruments used in your beat, such as piano, guitar, saxophone, etc.
- Mood – Choose the mood of your beat—chill, dark, aggressive, or anything else that fits
- Tempo – Select the tempo (BPM – Beats Per Minute) of your beat.
- Tags – Add tags (keywords) to help your beat get discovered by the right audience.
If your beat doesn’t contain a sample, there’s nothing to mention, just turn off the “Used Samples” button. But if it does, clearly state whether the sample is royalty-free or requires royalties.

-
Mention whether the sample is cleared or not. If the sample is cleared, check the box. If not, leave it unchecked.
-
Provide the name of the sample owner so the buyer is aware before purchasing the beat.
-
Add a link to the sample owner’s page, so the buyer knows where to go to clear the sample.
This helps avoid copyright issues and builds trust with buyers.
Click Next once you’re done.
Step 3: Upload Your Beat Media
Here you’ll upload the actual files that make up your beat.
You’ll see 4 fields:
1. Tagged MP3 File
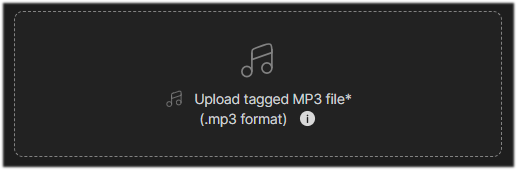
This is the version buyers will hear on the site, add your voice/beat tag here for protection. Size of the file should be min 2 mb and max 10 mb.
2. Cover Art
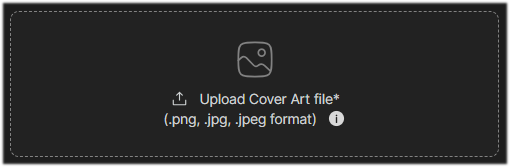
Upload a square image to give your beat a professional look. Logo dimensions should be 220*220 and size should not exceed 2 mb.
3. Untagged WAV File
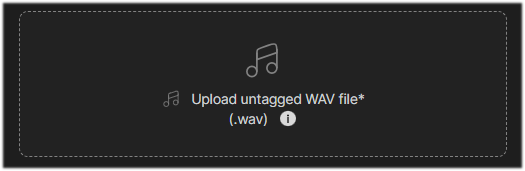
This is the high-quality version sent after purchase. Upload a stereo 44.1 kHz WAV format file. Size should be atleast 10 mb to 300 mb.
4. Stem Files (.ZIP format)
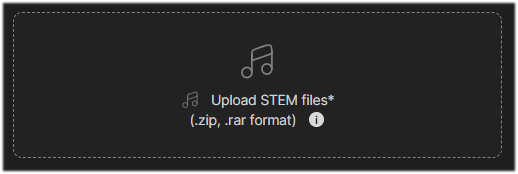
Upload all your beat elements (drums, melody, bass, etc.) as separate WAV files inside a zipped folder.
Click Next after uploading.
Important: Make sure your beat is mixed and exported properly. Poor audio = fewer sales!
Step 4: Set License Terms & Enable Mp3 Downloads
Here’s where you define how your beat can be used and how much it costs.
1. Enable MP3 Download (optional)

-
- If you want to let users preview your beat fully before they buy.
Just toggle this ON to allow free MP3 downloads.
- If you want to let users preview your beat fully before they buy.
2. Non-Exclusive License
A Non-Exclusive License means the beat is not only yours—the producer can sell it to other artists too.
You have legal permission to:
-
-
Use the beat in your song
-
Distribute and monetize it (within license limits)
-
But:
-
-
You don’t own the beat
-
Others can use the same beat under their own licenses
-
This allows multiple buyers to use the same beat.
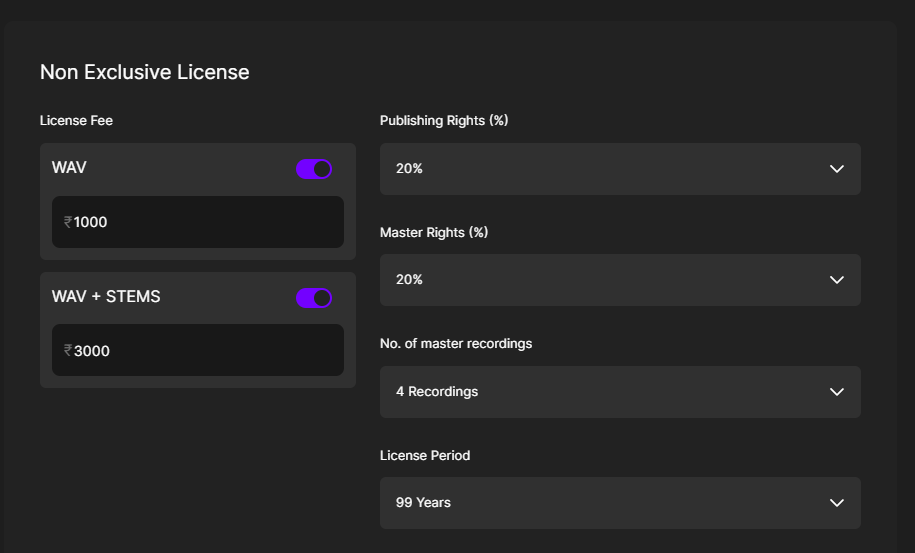
- Set the license fee for WAV, and WAV + STEM options
- Licensing Terms:
- Publishing Rights %
-
What are Publishing rights?
-
Publishing rights in the music industry refer to the rights over the songwriting and composition—not the recording.
This means:
-
Whoever wrote the lyrics and melody (like a songwriter or composer) owns the publishing rights.
-
These rights let them earn money when the song is played on radio, streamed, used in films, covered by someone else, or performed live.
-
Music publishers help manage these rights and collect royalties on behalf of the songwriter.
-
-
- Master Rights %
-
Master rights in the music industry refer to the rights over the actual recording of a song.
This means:
-
Whoever pays for or owns the final recorded version (usually a label or artist) holds the master rights.
-
These rights allow them to control how the recording is used—like streaming, licensing to films, or sampling.
-
They also earn money whenever that recording is played, sold, or licensed.
-
-
- Number of Master Recordings
-
“Number of Master Recordings” means how many different songs or versions you’re allowed to create using that beat.
For example:
-
If the license says 1 master recording, you can make one final song with that beat.
-
If it allows multiple recordings, you can create several songs or versions (like remixes, features, etc.) using the same beat.
In short: it tells you how many finished songs you’re allowed to make using the beat.
-
-
- License Period
-
License period means how long you’re allowed to legally use the beat under the license you purchased.
For example:
-
If the license period is 1 year, you can use the beat in your song for 1 year from the purchase date.
-
After that, you’d need to renew or upgrade the license to continue using it legally.
In short: It’s the time limit on your right to use the beat.
-
-
- Publishing Rights %
3. Exclusive License
An Exclusive License means you’re the only artist allowed to use the beat—once it’s sold to you, the producer can’t sell or license it to anyone else.
You can:
-
-
Use the beat in unlimited songs
-
Distribute, monetize, and perform it without competition
-
Often get more rights and flexibility than non-exclusive
-
In short: You get full control of the beat, and no one else can use it.
This allows only one person to own the beat.
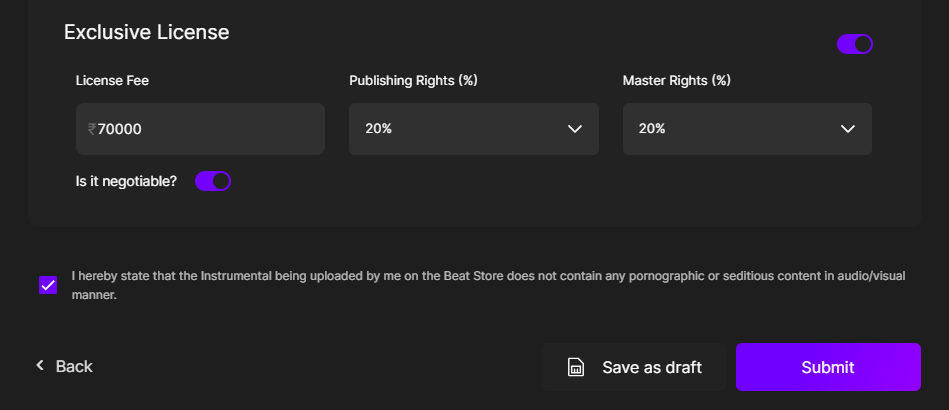
Fill in:
- Set the license fee of the Exclusive License
- Licensing Terms:
- Publishing & Master Rights %
- License Period = Lifetime
Note: Once a beat is sold exclusively, it will be removed from the store.
Step 5: Enable Negotiation Feature (Highly Recommended)
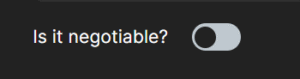
This is one of the most powerful tools available to sellers on Beat22.
Make sure to turn on the Negotiation feature for beats where the Exclusive License is enabled, it increases your chances of closing high-value deals.
Why?
Sellers who enable negotiation to see up to 30% more sales. It gives buyers flexibility to offer a price instead of walking away.
Final Step: Acknowledge the Terms
Before submitting, check the box confirming:
- You’re not uploading beats with pornographic or hate/seditious content
- All content is either original or properly cleared (especially if using samples)
Click Submit.
Once submitted, your beat will go live.
(DISCLAIMER: Beat22 does not legally represent any producers, sellers, and artists via this Platform. Beat22 is only recommending license terms as per universally acceptable industry practices. You are advised to consult with independent legal counsel before licensing any music and/or entering any transaction via Beat22 Platform.)